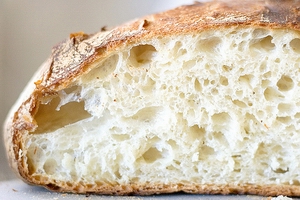
 |
| The bread that made bakeries obsolete. |
Ingredients
4 cups flour (3 1/2c white flour, 1/2c whole wheat flour)
1/4 teaspoon yeast traditional bread yeast, or SAF brand/type (special for 2nd rise breads)
1 1/2 teaspoons salt
2 cups warm water - MINUS 2 tablespoons (for vinegar)
2 teaspoons Vinegar (for Sourdough option)
1 tablespoon Sugar (opt. but makes really crunchy crust)
1 whole Olive oil (Optional)
1 whole Rosemary optional
Instructions
MIX:
Put dry ingredients in a large metal bowl, and mix with hands or spatula. Pour water in around the side of the bowl, then using a spatula, scrape the side of the bowl over the water, and work the water into the flour with the scraper. The flour will then become dry, with some flour not incorporated into the mix. Keep folding the dough over itself with the spatula, until it becomes a sticky ball. (Wet and sticky is good, it makes for a bubbly center).
FIRST RISE:
Cover the bowl completely with a plastic bag (folding it under the bowl to create an airtight seal), and place the bowl in oven or microwave oven to rise in for 12 - 18hrs at room temp. (63-65 deg.). At the end of this first rise it should look soft and bubbly, and glutinous strands (like melted mozzarella) should show when the dough is scraped up with a spatula and stretched out a bit.
Punch it down with the spatula and fold over a few times, then plop it out on to a well floured surface. Stretch the dough out flat with your hands, into a rectangle shape. Then fold 1/3 of the rectangle over, then the opposite side over (like folding an 8 1/2 x 11" sheet of paper to fit a standard envelope). Finally, fold the folded dough in half. Let this sit for 15 minutes, covered by a plastic wrap or bag. (this step may or may not be necessary, not sure!)
SECOND RISE:
Get a container that could be used as a "proofing bowl", and flour it to prevent the dough sticking (I used a small IKEA plastic bowl, with a narrow bottom and wide mouth. Rather than a skillet or such, this shape of container prevents the dough from spreading out too far, and creates a higher rising in the oven). Take the rested dough and place it in the floured proofing bowl (you can first place a tea towel or waxed paper in the bowl instead of flour, to make it easier to take out later). Cover with the tea towel, let rise in microwave oven (or reg. oven with pilot light on) for 1 - 1 1/2 hrs (ie. summertime may only need 1hr). You know the dough has completed its second rise, when you poke it and it does NOT spring back immediately.
BAKING:
1/2 hour before the second rise time is up (or simply before the dough is ready), turn the oven on to 450F. Place a 5qt dutch oven in there, and wait 15 min or so, til heated up (even waiting 1/2 hr to heat it is good, because the hotter the better!). Now scrape the dough away from the proofing bowl back on to the floured prep board and place it directly in the dutch oven, or scrape it directly into the dutch oven (may be more difficult this way, due to stickiness). I added flour to the inside of the dutch oven, which creates a floured crust. But this step is apparently not necessary. Shake the pan to settle the dough,and do not worry that it looks uneven, as it will settle in the oven. Make one, or several slits in the dough if desired, for rustic presentation.
Bake with the lid of the dutch oven on, for 30 m. Take lid off, bake another 20-30m, until nice deep chestnut brown. Turn the bread out immediately, and place on cooling rack.
Sourdough Option:
Add 1T vinegar for every 2.5c flour (remove as much water)
Quick Rise option:
Use warm, almost hot water, and add 1/4t red wine vinegar (removing 1/4t water).
Ferment for 3-4 hrs instead of 12-18.
Yields: 1 loaf
Comparing No-Knead vs. Artisan (Store-bought)
 | |
| Bakery-bought artisan sesame bread |
 | |
| No-Knead Bread |
Source: Gilbert Grape, Jim Lahey, Mark Bittman, and others.


1 comments:
I am not a huge bread lover but you really make me want to make and eat bread.
Post a Comment