Showing posts with label Bakery. Show all posts

Half and Half No-Knead Bread (50% Whole Wheat)


This is the latest and perhaps greatest, if not last, variation on the theme of no-knead "breading" for The Recipeless Cook. It is the coup de maitre of taking one half quantity of all purpose flour, and one half whole wheat (stoneground organic no less), and making the perfect bread out of the perfect compromise. It's one of my best variations. Why do this? Why not go all the way, with one flour type or another? Well....

Simply put, I got tired of having doorstops for supper. It's certainly healthier to go 100% whole wheat on the flour, and particularly so if using stoneground organic. But no matter what you try, you will end up with a much flatter, more dense and harder bread, than you otherwise would. Since all white flour is not a very healthy diet, I decided something healthier, and more challenging was in order. Look at the photo above and see if you agree. It is a bread made with half stoneground, organic "integral wheat bread" flour (aka whole grain whole wheat), half plain all purpose white flour (you could certainly use purpose-built white bread flour). It's a slow rise of about 18 hours, as described in my other no-knead recipes. To keep the bread fluffy and the crust soft, I add more yeast than prescribed, and throw in some gluten flour and (soya) milk powder. These last two are optional if you don't have them, but recommended for best results.

Keep It Simple

The no-knead bread recipe is more than a recipe. It's a lifestyle. It's taken a lot of the cachet out of artisan bakery bread and put it back in the hands of home cooks, where it belongs. It's made having fancy gadgets, like puce-colored stand mixers, unnecessary. It's simple enough to be understood by a 5 year old girl, powerful enough to change lives and their diets. It's a panacea in these economic times, where room to manoeuver is getting tighter all the time. Which is why, while it works, it works best if you create the bread on an ongoing, regular basis. Make it a permanent part of your routine, and you will likely benefit in spades. When you see you're getting down to a few slices, sometime before bedtime, prepare a new bread for the next day. It only takes five minutes. Ultimately, you can control what you eat by controlling what goes into your bread, and control costs by chopping your bread budget to a fraction of what it might have been, if you buy commercial.

By all means, experiment with the variations of the no-knead I have written about on this blog. But keep in mind that the simpler, is usually the better. Less things to go wrong. Example... creating a faux sourdough, as I write about in another recipe, can give a nice sour flavour and chewiness to the crumb and crust that a regular recipe won't produce. But it interferes with the rising process, and eventually creates a much more dense bread that can come out with a terribly glutinous core.


Ingredients

2 c all purpose (or bread) flour (aka white flour)
2 c whole wheat flour
1/2 t yeast
2 t salt
2 T gluten powder
2 T soya milk powder
2 1/4 c water

You can find more details on the ingredients (ie. gluten powder and soya powder) and the preparation for this bread in my other no-knead recipes (ie. 100% whole wheat no knead). The principle is the same, just the ingredients change. Some basic rules to go by:

  •  You use 1/2 c of tepid water per cup of flour. (n.b. The addition of the gluten and milk powder requires an additional 1/4 c)
  • You mix the ingredients first, in a large bowl. You can use your hands, a spatula, or as I currently prefer, a sturdy metal flatware spoon. (Hands can help you feel tiny details, like where the flour clumps. But I prefer a spoon, as it is more hygenic and gives greater control). Start in the centre, mixing vigorously, and allowing the edge flour to automatically blend in. Then scrape along the edge of the bowl to blend in the remaining flour, turning the bowl as you go. Then (ie. using the spoon), turn the entirety of the dough as many times as necessary (avoid mashing it if possible), to allow the wetter parts of the dough to absorb the stray quantity of flour. Do this until all the flour is absorbed.
  • Squeeze a plastic bag tightly over the bowl, and place it in either the microwave oven (with a glass of hot water), or better still, your regular large oven (along with a pot full of boiling water). This will increase the humidity in the oven environment, to allow a fuller rise. Let sit 18 hours in the oven, then proceed as instructed in the above (whole wheat) recipe. (As described, you will be baking it in a covered pot at 350F for about 1 1/2 hours).


Let's Make Bagels!


A delicious plate of Jewish donuts.

Some scholars of history believe that Napoleon conquered one country after another, in a quest to find the type of bagels he enjoyed in Poland, as a young boy**. Too bad he didn't have this recipe. If you think you can't make delicous bagels at home, that you have to buy them from a bagel factory... think again. You can. You don't need any special equipment or ingredients. And what you see pictured above, tastes a lot better than mass produced commercial bagels you buy at the supermarket -- especially in the frozen section. In fact, my guest thought they tasted better than the ones you buy at the bagel store. Whereas, I thought the texture wasn't right. The interior was soft and chewy, as it should be. But the exterior of at least some of them was too crispy, whereas they should be relatively soft.

That was partially my fault however. This was my first try at making bagels, so I had some mistakes to learn from. Namely, if you can't get them all on the middle rack, don't put them anywhere else! (I could not fit them all on one tray, and couldn't fit two trays on one rack. So some went on a rack near the lower heating element, some on a rack just above that. As a result, some were too well cooked, partly burnt, and others not cooked enough). Making home made bagels is really not that hard. It's a bit more trouble than no-knead bread, but much faster and they really are very tasty.  On top of which... check out the ingredients. There are no dough conditioners there, no malt powder, no additives, no junk. Flour, sugar, salt, yeast, water and oil. That's a purer list of ingredients than most bagels you are likely to buy, supermarket or bagel store!


Ingredients

4 cups bread flour
1 T sugar
1 1/2 tsps salt
1 T vegetable oil
2 t instant yeast
1 1/2 c warm water

Mixing

Dry and liquid ingredients
Dry ingredients (with oil)
Mix the dry ingredients and oil in a large bowl. Add the water slowly, incorporating the flour into it. It's important not to add too much water, as you want to end up with a relatively stiff dough, not a soppy, wet one. So you may wish to start off with 1 1/4c of water, adding another 1/4 c or less, as needed. For the all-purpose flour I used, 1 1/2 c was perfect. If there's still some dry flour not incorporated, break the dough up with your hands and use the moister inner portions to incorporate the dry parts.


Kneading

Step 1: Bunch up dough
before downward pressure
Dough mixed, ready to knead
Step 2: Preparing to flatten end
(apply pressure)
Step 3: After flattening one end
with palm of hand
Once the water has been completely incorporated into the dough, you can begin the process of kneading the dough. Since the dough should be relatively dry, it should not be necessary to flour the work surface at any time. Flatten and stretch out a portion of the dough (this should require quite some pressure), using the palm of your hand. At this starting point, the dough breaks easily. Fold over the stretched dough, give it a quarter turn, and repeat the process of stretching it out with your palm, then folding over. Knead the dough like this for about 10 to 15 minutes, or until it becomes softer, smooth, pliable, and has some elasticity when you stretch it (it shrinks back just a bit).
Step 4: Dough fully kneaded
and formed into a ball shape

Step 5: Cutting kneaded dough in half
(This is the hardest part of making this recipe. So if you don't like kneading, you can always cheat and use the kneading program on a breadmaker, or a stand mixer). When done, cut the dough into eight pieces, form them into balls, and let it rest under a tea towel for about 10-20 minutes.
Step 6: Ball of dough cut into 8 pieces
Step 7:
Forming 8 balls to roll into snakes

Step 8: Rolling a snake of dough
Step 9: Snake of dough, after rolling
Step 11: Showing joint of ends
Step 10:
Rolling snake to join ends
Step 12: Fusing ends, preparing to join
Get a flat, stable surface to work on with enough space. For each of the dough balls, roll it out with the palms of your hands into a snake shape. Start in the centre and move toward the edges. The surface of the dough will be dry and slip when you try to handle and roll it. So wet one hand under running water very briefly, and shake off the excess (you do not want to add too much water). Rub some moisture on the dough "snake" and it will grip the surface.


Step 13: 8 finished dough rounds
The width of the dough "snake" should be about a bit longer than the width of your two hands. Once you've got it long enough, wrap it around your hand, and wrap the ends under the palm of your hand. Then roll over the joint with the palm of your hand, moving your hand a bit from side to side, to ensure you have gone over the joints. Repeat for the rest of the dough balls. Once done, let them rest under the tea towel for about 20 minutes.


Boiling
Dough snakes become halos.

Step 14: Seeded dough rounds before baking
Bagel soup anyone?
During this time, pre-heat your oven to 425F, fill a large pot with water and bring to boil (on the stovetop). Drop two to four bagel circles into the boiling water (if properly made, they should float to the top in no time). Take care not to crowd them and do not cook too many at a time. Work in batches, instead, until all the bagels are cooked. Boil for 30-60 seconds on one side, flip each over, boil other side the same amount of time. Then remove each boiled bagel to a drying rack. Or, if you are using seeds, place the (uncooked) seeds on a plate or tray, and dip one side of a boiled bagel over the seeds, then place seed side up on a drying rack. Dry for a minute or so.


Baking

Sesame seeds
(pat down to spread on plate)
Sesame seed bagel
drying after removing
from water.

Once all the bagels are boiled and dried, place them seed-side up on a baking tray well oiled with vegetable oil (preferably olive). Place the tray on the middle rack of your oven, bake 10 minutes one side, flip, 10 more minutes the other side. Let cool 20 minutes.


Toppping

Jackpot! 8 perfectly baked bagels (attempt no. 2)
You can make these plain (without topping), or use sesame seeds, onions, poppy seeds, caraway seed, or whatever you like.

**(This sounds totally made up).

Peach Yogurt Cake with Fruit Glacé


Heart-shaped yogurt cake. Literally bleeding with delicious goodness.
It was my birthday today, so in the Recipeless kitchen, that can only mean one thing... it's cake time. Time to make a cake. I can't remember the last time I ever tried to make a cake from scratch... never, maybe? I did okay with the muffins, so I looked at the cake thing as just being "one large muffin". And indeed, the way it puffed up in the oven, it kind of looked like one large heart-shaped muffin (I threw in too much yogurt, but don't worry, I adjusted the measurements for you!). Why heart-shaped? Well why not? (And also because I couldn't find what happened to my regular cake pans).

This all started because I had some fruit flavored yogurt in the fridge that I needed to polish off, and it was way too much to finish at once. So why not use it in a cake? The problem with many cakes is that they are too dry. No problem with that here, I assure  you. This cake is so moist, that my associate taster likened it to cheesecake. And indeed, it did resemble cheesecake. The beauty of it, is that it still leaves much room for variation; making it near-recipeless.

For example, I used a peach yogurt, but you can start with plain yogurt, and add whatever fruit you like. If you have berries, you can even just sprinkle them on top of the batter, for a fruity topping. For the glacé (glaze topping), while it looks like strawberry in the pic, it's actually blueberry. Though I might have preferred peach or even a citrus jam or marmalade, it's what I happened to have on hand, in a jam. So you could use whatever jam or jelly you prefer, for the glaze. No matter how  you vary the basic recipe, it still remains, like most of the Recipeless Cook recipes, quite easy to make. Even if you've never made a cake before. Now let's get started!...


Ingredients

2 eggs, lightly beaten (or at least idly threatened)
3/4 to 1 c yogurt (plain or fruity)
1 c sugar
1/4 c neutral-flavored healthy vegetable oil (ie. good canola) (Substitution: melted butter or margarine)
1 1/2 c all purpose flour
2 t baking powder

Glacé (topping)

1/4 c jam or jelly
1 T lemon juice
1 T sugar


Instructions

Cake

Mixing the liquid ingredients
In a large mixing bowl, add the yogurt and sugar, and mix until combined. Add the beaten eggs, and stir into the mix.
Popping the batter-filled pan
in the oven
Add the flour, and next the baking soda. Mix with a spatula, scraping around the edges of the bowl, until you have just combined the flour into the liquid ingredients. Ensuring that no patches of flour remain. Add the oil, and continue mixing with the spatula, until all is combined and cohesive. Pour the mix into a cake pan, greased with margarine, butter or oil. Bake in a 350F oven. 
From batter to (finally) cake. Success!
Check for doneness, at about 30 minutes. (n.b. The exact time depends, in part, on how much yogurt you used, and the size of your cake pan. As I originally used 1 1/4c yogurt, my cooking time was at least 45-50 min. I estimate the above measurements to take about 30-35 minutes). Use a toothpick in the centre to test for doneness (cake is done when the toothpick comes out clean, and the edges spring back when poked).

From puffy cake to grilled cake
Allow the cake to cool in its pan on a wire rack for at least 15-20 minutes. Then, to prevent a soggy bottom, carefully remove from the cake pan and let it finish cooling on the wire rack, another 15-20 min. n.b. I used an aluminum cake pan, margarine, and no parchment paper. I did not have a problem releasing the cake from the pan. But I did use a blunt dinner knife gently, around the sides of the pan, to help it release from the pan.

Underside of cake during cooling.
After separating it from the side, I inverted the cake over a wire rack (pictured). Because this meant the top of the cake was facing the rack, the rack burned "grill marks" into the soft, hot cake. No problem, that just adds character! If I wanted to prevent this, I'd take a plate, or non-stick cookie sheet, place it over the bottom of the cake, flip the entire thing right-side up, then carefully slide the cake back on to the cooling rack.


Glacé (topping)

Spoon the jam or jelly into a small glass or ceramic mixing bowl. Add sugar and lemon juice and mix well. Then heat up until the sauce has reduced to desired consistency (fairly thick, if you want it to adhere well to the top of the cake. But not too thick, if you want it to drip down the sides, as pictured). You can heat this up by either placing the bowl in a microwave oven for a couple of minutes (as I did), or, better results can be obtained by heating it in a small saucepan over the stove top. You have more control here over the desired consistency, and it takes about the same amount of time.

No Knead Multigrain Bread


Bread so good, it tries to eat itself.

I explain the process for slow no-knead bread in detail, in this first recipe for creating a sourdough no-knead bread. However, in this variation, I'll show how to pull it off using, in part, multigrain flour. Pictured above is probably my fourth attempt at making a no-knead. (This one is just a hair above 4" high, and 7 3/4 - 8" wide). The more practiced you are at this lazy man's way of breadmaking, the more you can refine your method. And I did.

Although this is still the straight slow no-knead method, by playing a bit with the ingredients and process, I did manage to shave a few hours off of my usual time. While still producing even better results than I acheived in the first recipe for faux sourdough. So I recommend you give this one a try, even if you don't have or wish to use multigrain flour (in which case it'll be 4 cups of white flour). I use sugar in this recipe, which gives a darker, sweeter and very crispy crust. If you don't need that, leave the sugar out, the bread will still be good.


Ingredients

3 c all-purpose flour
1 c 6-grain (or 7,8 or 9 grain etc.) flour
1 t yeast
1 T sugar (optional)
1 1/2t salt


Instructions


WET MIX

Add salt, yeast and sugar to a glass bowl; then pour in 1 1/2 cups of warm water. Mix until the yeast has dissolved (use a whisk if necessary, to break up the yeast if it has clumped up). Let this sit while you prepare the flour.

DRY MIX

In a large bowl, add the all purpose and multigrain flours, mix together. After the yeast water has rested 10 minutes or so, pour it around the sides of the bowl containing the flour, and using a spatula, mix until the flour is incorporated. Start by scraping the water and flour off the sides of the bowl as you turn the bowl, and the flour will gently form a ball. Continue scraping the bowl around and underneath the ball of flour, until the ball is pulling dough and flour off of the bowl, and it forms a fairly smooth ball. Do not poke the center of the ball with the spatula. Just manipulate it by the exterior.


FIRST RISE

Cover the entire bowl with a plastic bag, wrapping the bag under the bowl, to make it airtight. Place the bagged bowl in a microwave oven to rest for 10 - 12 hours, until the dough has at least doubled (in mine, the dough had risen to beyond the edge of the large bowl and touched the bag, after about 10 or 11 hours). At the end of this process, the dough should have bubbles across the surface, and when you tilt the bowl, the strands should gently stretch as they pull away from the sides.

SECOND RISE

Now scrape the dough away from the side of the bowl with your spatula, all around the bowl, until the dough is no longer sticking to bowl (n.b. This will reduce the size of the dough, as the air releases). Again, you are only manipulating the exterior. Do not punch or poke the center of the dough. Flour a work surface to receive the sticky dough. Invert the bowl over the floured surface, and let it fall on to the surface (this should happen fairly easily, as you have already eased the dough away from the bowl).

Take your lump of dough and lifting it from the bottom, fold it over itself halfway (as though you are folding a letter in thirds). Fold the top half over in the same way. Next, fold the right side halfway, then the left side, until the dough has been folded on all 4 sides. Now repeat this process 2 or 3 more times.

Prepare a "proofing bowl" by flouring and/or oiling the sides of the bowl, to prevent the dough from sticking to it, and allow it to rise with least resistance. This proofing bowl can be the bowl you used for the first rise. It is preferable to be either a purpose-built proofing bowl, one made of glass or ceramic, or plastic. In order of preference).  Place the dough into the bowl, cover it with a tea towel and into the microwave oven for the second rise. Let your dough rise for 1 to 2 hours (in mine, the dough had risen beyond the lip of the bowl in about 1 to 1 1/2 hours).


BAKING

Pre-heating the dutch oven

The idea of preheating a dutch oven is to create a crispy, flavorful crust, making use of moisture trapped inside the pot. So one half hour before the end of the second rise, turn your oven to its highest temperature (or 500F to 550F). Place the oven rack to its lowest position, and put your dutch oven onto the low rack (including the cover) to pre-heat for at least 15 to 30 minutes. n.b. It is safer not to place the cover over the empty vessel, so either place it next to the pot or resting against it. However, if the handles of your dutch oven are bakelite (plastic), wood or silicone, and not rated to handle this high of a heat, then either do not place the cover in the oven during this process, or cover them well with a double layer of foil.

Transferring the dough

Carefully remove the heated dutch oven using heavy duty (well insulated) oven mitts or pads. Place it on a wood, cork or metal trivet. (Do not place it directly on your smooth ceramic stovetop!). Sprinkle a handful of grain on the bottom of the pot, to prevent your bread from sticking (preferably sesame seeds, or... cornmeal/flour/wheat germ/etc.).

Taking the bowl containing the dough, scrape the dough away from the side of the bowl with your spatula, all around the bowl, until the dough is no longer sticking to bowl (n.b. This will reduce the size of the dough, as the air releases). Again, you are only manipulating the exterior. Do not punch or poke the center of the dough. Invert the bowl over your preheated dutch oven, and allow the dough to fall into the pot. Using a sharp knife, cut three slits across the top surface of the bread, about 1/2" deep (or two slits in a cross fashion). If you wish, you can also sprinkle sesame seeds over top.

Baking the bread

Place the pot back into the oven on the lowest rack, and turn the oven down to 425F. Bake for 30 minutes covered (with the lid on). Then remove the lid and bake for about another 30 minutes, until the bread is dark or caramel brown. Let cool on a wire rack until cool to touch.

Pear Muffin Cakes With Crumble Topping


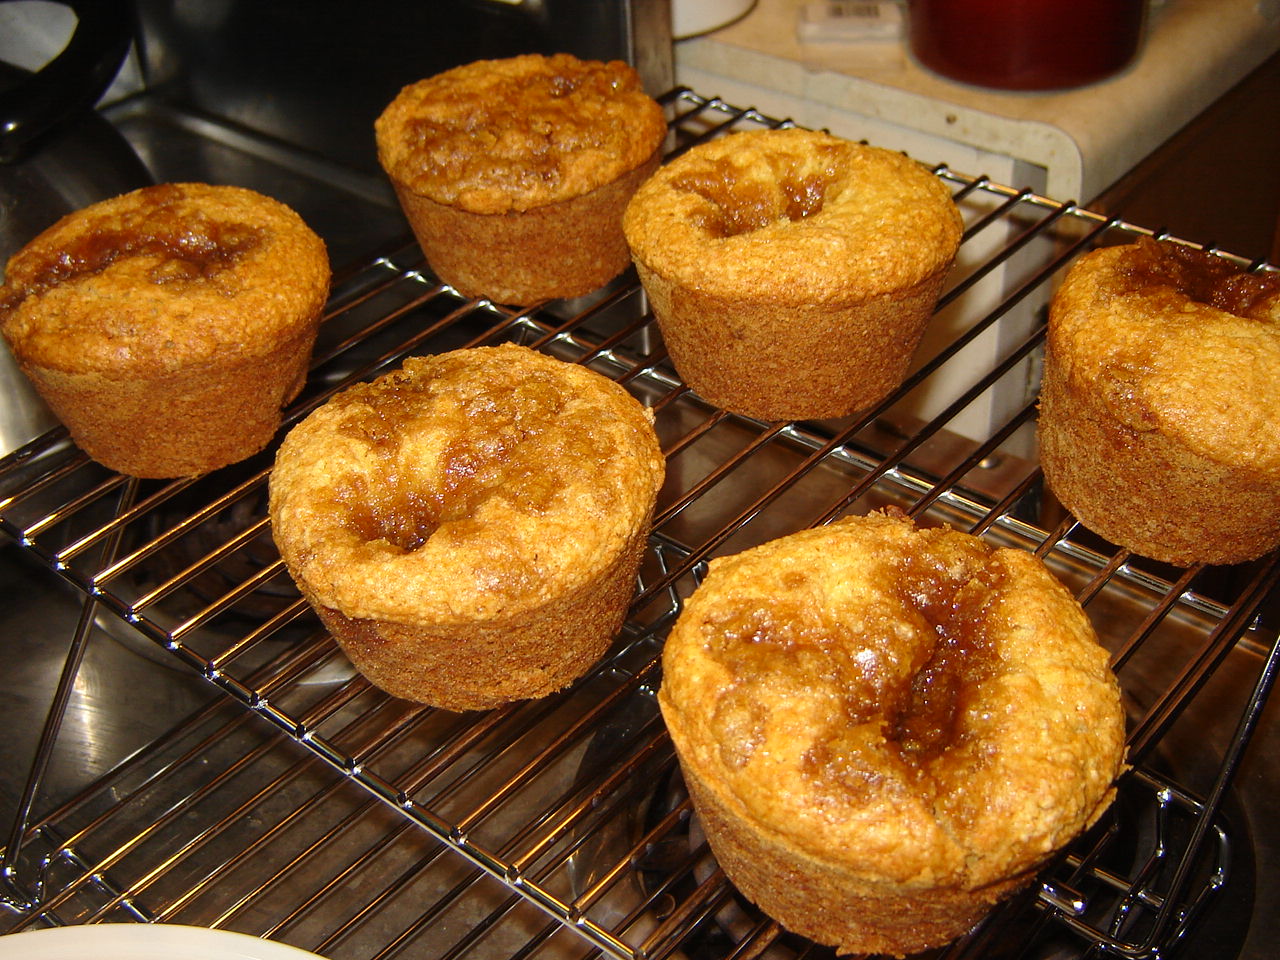
Not knowing if he's a muffin, a cup cake,
or a "muffin cake", was deeply
confusing for Charlie the Muffin Thing.
After "mastering" cookies, I decided to turn my sights to the ubiquitous muffin. I've never been a great fan of muffins, but I reckon that's probably because they're often not that good. Good, soft, flavourful, tasty muffins are "ok". But bad muffins, the worst of which often come from a home kitchen, just don't make me eager to eat muffins. Sometimes I've had to practically force them into my mouth with the aid of both hands, when one hand would put up too much resistance. Some of the reasons I don't care much for muffins, is when people try to make them too "healthy", and use "healthy" flours. e.g. Low-gluten flours like whole wheat, or organic.

I have nothing against the idea of making them healthier. It's just that these sort of choices have a tendency to make the muffin small, hard, dry, tasteless, and with the mouth feel of a rolled-up sock. Which become even worse when refrigerated and cold. Other muffin turn-offs include when it has chocolate chips or other ingredients that are too sweet. When it has "special" ingredients that just shouldn't be in a muffin; like zucchini. Or ingredients that are traditional for muffins, but just taste awful anyway; ie. bran.

Apple version with cinammon crumb
topping; regular and shallow size.
Yes, they're as delicious as they look.
The muffins in this recipe though, are ok. No, better than ok. They're pretty good! Though pretty sweet, but you can reduce the sugar if you like. No law against it. If underripe, the pears might be a bit subtle in flavour. You can substitute apples instead, which should raise the flavour profile a bit. Alternatively, you can also use three or four bananas, if you have a few on hand. Or why not pineapple chunks or a mango? Yum. Even if you have no fresh fruit in the crisper, try substituting apple sauce!


Ingredients

Fruit Mix:

2 - 3 pears, peeled (Substitution: Apples)
1/2 c white sugar
1 egg, lightly beaten
1/3 cup butter or a good (not-partially-hydrogenated) margarine (Substitution: Healthy, high quality, flavourless vegetable oil)

Flour Mix:

1 1/2 cups all-purpose flour (Substitution: 1 c a-p flour, 1/2c whole wheat flour)
1 teaspoon baking soda
1 teaspoon baking powder
1/4 t to 1/2 teaspoon salt

Topping:

1/3 cup packed brown sugar
1 t vanilla (Substitution: 1/4 t ground cinnamon)
2 tablespoons all-purpose flour
1 tablespoon butter

Instructions

Fruit Mixture:

Pear fruit mixture after processing
For this recipe, you will require a muffin pan/papers, and (for best results) a food processor. If using pears, cut the pears in half, and remove the stems. Using a small, sturdy spoon, scoop out just the hard centre part, turning the pear as you carve the piece out. Discard. Lay the pear flat and use the spoon to cut a small piece off the end, and discard the end piece. If the pear is firm, you can peel off the skin at this point with a peeler. Start peeling around the edge, and turn the pear in your hand, as you peel around until all the peel has been removed. (If using apples, do similar). In a food processor, add the pear halves (or apples), white sugar, beaten egg and margarine. For a lighter muffin, process the mix for a couple of minutes until the fruit has been totally incorporated into the mix, and the mix is smooth, creamy, and light. Like frosting. For a tastier muffin, process in brief pulses, only until the mix comes together, while the pieces of fruit are still more or less intact.

Flour Mixture:

Flour mixture
In a large bowl, add the flour, then baking soda, baking powder and salt. Mix well to combine. Add the fruit mixture over top of the flour mixture. Running a spatula against the side of the bowl, slowly incorporate the flour into the wet fruit mixture, keeping the spatula against the side of the bowl as you turn the bowl with the other hand. Mix until the flour has just barely all dissolved into the liquid. Do not overmix. Prepare oven for 375F degrees, and your muffin pan by using a bit of the margarine or oil to grease the cups of your muffin pan. Pour the muffin batter into your muffin pan using a large spoon. Fill the muffin cups evenly, until the batter is used up.

Topping:

Brown sugar/vanilla topping mix
Add the brown sugar, 2 T flour and vanilla (or cinammon) in a small bowl. Mix, and add 1T butter or margarine to this mixture. (If using cinammon, it should have a crumbly texture, and if vanilla, a moist semi-crumbly texture). Sprinkle some of this mixture on top of each muffin.

Baking:

Charlie the Muffin Thing, plus wife
and four chidren: The Eartly Years.
Bake about 18 - 20 minutes for small or regular size muffins (ie. a 12 cup muffin tin), and 30 - 35 minutes for large muffins (aka "muffin cakes", pictured); which come a half dozen cups per muffin tin. Check after 20 minutes. Muffins should be deep golden at the edges (see photo) and a toothpick inserted into the centre should come out clean. When done, remove from the muffin tin and let cool on a wire rack about 15 minutes (to keep the bottoms from becoming soggy).

Speedy No-Knead Bread


The no-knead sourdough recipe I put up here is brilliant, but... it's hardly fast food. What if you don't have 12 to 24 hours or more to fuss over a loaf of bread? Even if it's brilliant? Then you have this option. Which gives you a hand-made artisan-type bread, in about 4 hours from start to finish (excluding cooling time).

It's still a very good loaf of bread, at about a little longer than it would take for your bread machine to produce a loaf that, let's be honest...  looks and tastes like school cafeteria food in comparison. Plus, you have the bragging rights to say you created the loaf yourself. Because the rise and proofing times aren't nearly as long, the gluten doesn't have as much time to develop flavour and that gorgeous swiss cheese texture a good artisan bread can produce. Still, you get a bread that's nearly 4" in the centre (large enough for cold cuts), with a soft, spongy, springy centre, and a very crispy, chewy crust.

Active Dry Yeast
Active Dry Yeast
A Word About Yeast:  There are several different types of yeast on the market, and their names can be very confusing. But the recipe and results of your bread can depend on the type of yeast used. Probably, the most common type is "active dry yeast". Comes in jars and packets, as well as vacuum sealed 1 lb. bags (see photo). If you're buying your yeast in packets, don't. You're just paying a lot extra for a company to measure out the quantity for you, and furthermore, contributing to environmental waste by having each 2 1/4 teaspoons (the equivalent of 1 packet of yeast) in separate foil packages. Especially when it's no less "convenient" to dip a measuring spoon into a box or a jar.

Active Dry Yeast
If you're buying active dry yeast, also stop doing that. Instant dry yeast is usually what professional bakers use, and most consider it to yield superior and consistent results. Typically sold in 1 lb. vacuum sealed bags, it is also far less expensive per ounce than active dry yeast. (see photo) Moreover, if sealed well in an air tight zip lock bag and placed in the freezer, it can still remain active and useable for literally years beyond its (typically two year) expiration date. I keep a small quantity of IDY (instant dry yeast) in a dark jar in the fridge, the rest in the freezer. Finally, active dry yeast needs to be "proofed" (dissolved in water a few min.), while instant type does not.

A Word About Measurements: When baking, not paying attention to details can sometimes mean the difference between success and disaster. I am speaking of course, about measurements. For example, did you know that not all measuring spoons measure alike? I learned that when I suspected my metal dollar store measuring spoons were significantly larger than my metal "America Cooks" brand spoons. And they were. One teaspoon should equal 5 ml. liquid, and the dollar store spoons gave more than that. (Though price may not necessarily indicate accuracy). When a difference of 1/4 of a teaspoon (of yeast) can throw a recipe off, accuracy can be important.

Same with measuring cups. My good quality "America Cooks" metal dry measure measuring cups gave me 159-160 grams of AP flour, versus 145 grams of my plastic Ecko dry measure measuring scoops. As one cup of AP flour should equal 5 - 5.5 oz., the metal measuring cups were giving me about 15g too much flour per cup. Multiply this error by 3 or 4 (cups for a recipe), and 60 grams is a significant difference in the quantity of flour needed for a recipe. That can end up with undesirable results.  So when baking bread, it helps to know your measures.


Ingredients

2 t instant dry yeast or 2 1/2 t active dry yeast
1 1/2 t salt (preferably coarse or kosher)
3 1/4 c all-purpose flour
1 x cornmeal (optional)
1 1/2 c water


Mix:

Instant Dry Yeast instructions:

  • Add the 3 1/4 cups flour and salt to the liquid mixture. (Tip: Always use a knife to stir the flour well in your container, before putting it in the measuring cup. This ensures you have the right proportions of flour. Overfill the measuring cup, then use the knife to level off the flour).
  • Using a rubber spatula, turn the bowl with one hand as you scrape the flour off the sides and slowly incorporate it into the liquid. Reach down frequently into the bottom with the spatula, gently bring it up to incorporate the flour into the mix. Do not overmix! Just mix the flour into the water, turning the dough with the spatula, until most of the dry spots are gone. (n.b. You do not need to shape it into a ball. It will be fine as it is, a somewhat messy looking lump of dough. If you see air bubbles in it, even better).

Active Dry Yeast instructions:
  • Pour in 1 1/2 cups of lukewarm water in a large glass, ceramic or plastic bowl, preferably glass or ceramic. (Optional: Pour a little bit of olive oil in first, rub this with your fingers all around the bowl, then add the liquid. This should help with the rising process, and add flavour).
  • Next, add yeast and salt, mix well to combine.
  • Add the 3 1/4 cups flour to the liquid mixture. (Tip: Always use a knife to stir the flour well in your container, before putting it in the measuring cup. This ensures you have the right proportions of flour. Overfill the measuring cup, then use the knife to level off the flour).
  • Using a rubber spatula, turn the bowl with one hand as you scrape the flour off the sides and slowly incorporate it into the liquid. Reach down frequently into the bottom with the spatula, gently bring it up to incorporate the flour into the mix. Do not overmix! Just mix the flour into the water, turning the dough with the spatula, until most of the dry spots are gone. (n.b. You do not need to shape it into a ball. It will be fine as it is, a somewhat messy looking lump of dough. If you see air bubbles in it, even better). 

First Rise:

Cover the bowl with a dinner plate, making sure to leave a small gap to allow air to pass. You can place this in your regular oven (preferably with the light on) or microwave oven, to help it rise. Allow it to sit for two hours minimum (although the longer the better, if you have extra patience). (n.b. The images on this page show a bread developed with a 2 hour first rise, and 45 minute second rise).

Second rise:

  • Dump the dough from the bowl on to a floured surface, and shape it so that it has a round top with a flat bottom, by turning it around the edges with your hands. Flip over and do the same on that side, shaping it into a round dome with a flat bottom. (n.b. You are only doing light, brief manipulation of the dough, here. No kneading or full shaping is involved). n.b. If the dough is very sticky and difficult to work with, no matter how much you flour the surface, then it was initially undermixed. In this case, return it to the oiled bowl from its first rise. Continue to turn and work the dough into itself with your spatula, punching and flattening the ball with the spatula, until the dough scrapes off the residues on the sides of the bowl.
  • Rub oil all around the inside of a 5qt. dutch oven (raw or enamelled cast iron pot), which has a lid. (n.b. If the lid has a wood or plastic bakelite knob, cover it well with aluminum foil, because things are about to heat up! Note that even bare silicone handles may not handle degrees over 450F. Consult with your manufacturer). 
  • Dump your dough into the pot, and place the cover partially on, to leave an air gap. 
  • Let it rise (as before) a second time, for 40 minutes. 
  • Dump the dough back out into the bowl you used for the first rise. 


Baking:

Dutch Oven Method

Pre-heating:

(Alternatives: n.b. Pre-heating improves the crust. But if you do not have a pot that is oven-safe to 500F, you can not follow this step. Cast iron is best and gives best results. But it should be possible in a regular pot, again if oven safe to 500F. If you have no dutch oven but do have a covered glass baking dish, it might also be feasible with that. In this case, do not pre-heat, and skip to the next step. Just be sure your glass baking dish is oven-safe to 425F. There is a higher risk of breakage with older pieces).
  • Here, you may, if desired, sprinkle cornmeal (preferably) or flour on to the bottom of the pot, to help release the bread, and flavour it. 
  • Now place the empty dutch oven pot covered with the lid on to the lowest rack in your oven (lower your middle rack if necessary). 
  • Turn the heat on to 500F degrees. 
  • Leave it in at least long as it takes for the oven to get to 500F, but preferably for 30 minutes. 
  • Carefully remove the dutch oven (with oven mitts!), place it on a heatproof surface, and remove the lid.

In the oven:

  • Take the bowl containing the dough and place it over top of the open dutch oven, carefully turn it over, and allow the dough to slowly fall into the dutch oven (if too sticky, you can help it by scraping the dough away from the sides of the bowl with your fingers). (n.b. Careful not to touch the pot with bare hands, it will be very hot!)
  • Using your oven mitts, pick the pot up and shake it, to help the dough relax into the pot. 
  • Using a sharp knife, make three slits across the dough, about a half inch deep (careful not to scratch the sides of your pot with the knife). 
  • Cover the pot with the lid, and place the dutch oven pot into your oven. 
  • Turn heat down to 425F, and bake the bread for 30 minutes. 
  • Remove the lid and bake until the bread is deep brown (see photo), about 30 minutes, give or take 10 minutes.


Out of the oven:

Invert the pot and dump the bread on to a cooling rack. For best results, allow to cool to room temperature (about 1 - 2 hrs). (n.b. After the first rise, if you wish to continue the bread later, you can store the dough in the fridge in a loosely covered plastic container for up to two weeks. You can also double the quantities and bake one bread, while storing the dough for another later on).


Bread Loaf Pan Method

Quick no-knead, conventional bread loaf pan
For those who do not own a dutch oven and do not plan to, I bought a bread loaf pan just for you (it's environmentally-friendly ceramic non-stick. Hope you approve...). Just to see how well the no-knead bread could turn out in a traditional loaf pan. The photos you see are the result of my first attempt at no-knead bread in a loaf pan. The instructions are the same as above for the dutch oven, but forego pre-heating the loaf pan. Just keep the oven at 425F.


Quick no-knead, end piece
I did not follow these instructions myself for this first attempt. I pretended the loaf pan was a dutch oven, olive oiled it and preheated it at 550F for about 10-15 minutes, removed it, added organic corn meal to the bottom of the pan, dumped the dough in, then reduced the heat to 425F before putting the bread back in the oven.

To make the bread, I used 2t instant dry yeast (for 3 1/4c flour) ("Komae" instant yeast, from China). I also used a teaspoon of vinegar (in the 1 1/2c of water). (n.b. Vinegar is recommended for quick no-knead, as the shorter rise time results in less flavorful bread, and it's an attempt to add flavour).

I cooked it for an hour @ 425F and even so, the crust wasn't colouring to my taste.  Although I would have preferred a darker crust, I had no more patience to wait, as my chicken burger for supper required fresh bread! The resulting loaf was a sickly pale brown-ish colour, and about 3" at its highest point. Very dry, so quite unlike the dutch oven crust. I did not wait the recommended time before slicing it.

Chicken Burger w/ swiss cheese, dijonnaise, lettuce 
& green pepper on fresh quick no-knead bread
The crust was very crunchy, and the cornmeal added a great taste. The inside was soft, spongy, and had some air bubbles, though not evenly so. But more than the dutch oven recipe pictured above. The bread did not taste of vinegar, sourness or sourdough. Nevertheless, this attempt had a subtle but great flavour, such that I could not stop eating it. I preferred its taste to the earlier attempt in the dutch oven, where I used ADY (active dry yeast). But if nothing else, the dutch oven produces a superior crust, color, size and form.


"i heard beauty calling 
 i heard her one morning 
 from my place in the dust 
 i walked through the gloom 

 she stood in a clearing 
 said where are you going 
 i said to tomorrow 
 but i'll stop here with you 

 you stand or move
 and i'll lead you along 
 for you have a body 
 and i have a song...  "


- "I Heard Beauty Calling"
: Morning Star
 
The Recipeless Cook © 2008 | Créditos: Templates Novo Blogger